
 Many breeders and pet owners like myself are moving away from chemical worm and flea treatment and are turning to a more natural approach to eradicating parasites. The over-use of worming drugs increases the speed at which parasites will develop resistance to the drugs. So, being able to test your dogs for worms at home is an excellent skill to have and can save you quite some money in the long run. Aside from cost, why should we be pumping chemicals into our dogs to treat something they may never have when you can simply test for them? You may never have to treat them at all. This simple guide will show you how easy and inexpensive the process is.
There are a number of natural products that can certainly help to keep such parasites at bay without the need to keep giving chemicals every few months, just in case. Many people don’t use anything at all and there is lots of anecdotal evidence to show that a good raw diet alone can help to keep these nasty critters away.
Regardless of whether you use anything or not it can provide great piece of mind to know that your dogs aren’t infested. External parasites are often obvious to identify but with such things as worms, you may never know until the infestation becomes so bad that you need a vet so checking for worms regularly is recommended.
A vet can check your dogs’ stools for an infestation and there are lots of other providers of such a service. A quick online search will reveal a number of postal services with varying costs. wormcount.com is just one example.
I like to run my own worm tests, this is a relatively simple process and is certainly not expensive, in fact, the cost of purchasing the equipment you need can be cheaper than paying to have it done for you just a few times. If you have a number of dogs like myself, the cost of worming your dogs for a year can be more expensive than buying the kit to test for them.
Before I begin please note that I am not a vet and I am not attempting to give veterinary advice. This is simply what I do with my own dogs.
 Here is a list of all the things you need:
• A Microscope with 10X power and a built in light
• Glass Slides
• Slide cover glass (or coverslips- small, very thin cover glasses fit on a slide, temporarily flattening the liquid specimen)
• Test tube that holds 20 ml (Ø16mm x 150mm tubes hold 20 ml)
• A weighing scale that measures grams. (Not essential but if you want consistent results it is recommended that you use one)
• A Timer
• 3 measuring cups/beakers – one that holds at least 30-50 ml, one that can measure 25 ml, one larger one that you can strain into. It’s advantageous if the larger cup/beaker has a pouring spout. If it doesn’t you may need a small funnel
• Seive/Tea strainer
• Craft sticks/Ice-lolly sticks (or anything similar to use as a stirrer)
• Test tube holder (or a block of wood with hole drilled or piece of polystyrene with a hole dug out to hold a test tube)
• Flotation Liquid eg. Fecasol (you can make your own very easily and much cheaper, see instructions below)
• A tally counter or paper and pen to note amount of worms found
• Disposable gloves
When buying a microscope I suggest a little research beforehand. You can buy a cheap child/student microscope for around £40, so long as it has a 10x objective then it should do the job. However, a more expensive scope with a mechanical stage makes the task of searching so much easier. 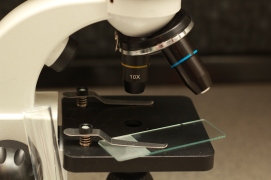 Also, a binocular scope rather than a monocular will also make the task easier on your eyes, especially if, like myself, you end up running worm counts for others as well as your own or if you have many dogs and need to spend some time using it.
Microscopes are lit by either a bulb (powered by the mains or by batteries) or a mirror which directs the available ambient light through the slide. If you intend doing your fecal egg counts in an outbuilding without power, ensure the microscope you choose runs on either batteries or is fitted with a mirror.
Method (You may want to use gloves):
 1. Collect fresh stools from your dog
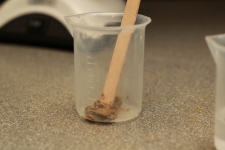
2. Weigh out 3g of poo. (3 grams is about ½ – ¾ teaspoon)
3. Put the poo in a small cup or beaker that can hold 30-50 ml and mash it up with the lolly stick
4. Slowly add, while stirring, 25ml of floatation liquid and stir it well
5. Let it sit for a few minutes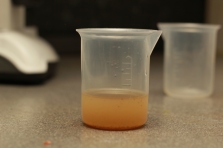
6. Strain the poo solution into another cup or beaker. Squeeze the poo really well to force as much liquid out as possible
7. Let it sit for a few minutes
8. Place the test tube in the holder
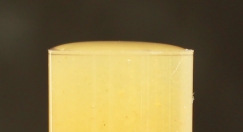 9. Stir the solution and then pour into the test tube. Fill it right up so the solution overflows slightly and sits proud of the rim of the test tube
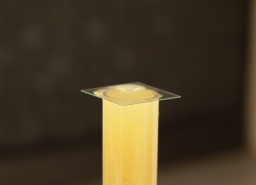 10. Carefully place a coverslip on the test tube. The solution should touch the coverslip. You may get some overflow but this is ok
11. Let it rest for around 15 mins to give the eggs time to float to the top of the solution and collect on the underneath of the coverslip. Make sure you leave it for a min of 5 mins and no more than an hour. You will notice most of the fecal matter has sank to the bottom of the test tube.
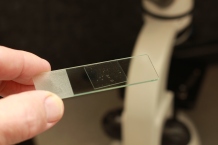 12. Carefully remove the coverslip by lifting it straight up and place it wet side down on a clean slide so as to sandwich the fecal solution that has adhered to the coverslip. This spreads the solution to fill the coverslip. You may get some over spill but this is ok.
13. Place the slide on your microscope and begin looking for worm eggs.
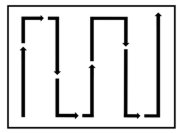 At 10X power, find a corner of the cover slip to start at. Search the slide by moving it slowly in a left to right or up and down pattern, whichever you find easier. It’s not easy at first because looking in the microscope is like looking in a mirror, when you move the slide up, the slide moves down in the scope. When you move left, it appears to be moving right. It takes some practice but you’ll soon get the hang of it.
You won’t see any worms, just their eggs. Every time you see a worm egg, press the tally counter or make a mark on your paper.
The eggs are small, so take your time and keep looking. Make sure you know what you are looking for. Here are some images of worms eggs under the scope to familiarise yourself with. The most common worm and the one you will most likely 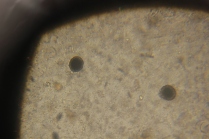 see is Roundworm. You will see all sorts of stuff in the fecal matter and you may often see what looks like worms or a piece of string. Remember, these are not worms, just fibres that haven’t been digested.
Eventually you will probably see a worm egg, if you’ve studied the images you will know what you are looking for and once you’ve found one they become easy to spot. If you find what you think is a worm egg you can switch your microscope to 40X power to get a closer look if you wish. Be careful using 40X power, and adjust the focus very slowly as the lens gets so close to the slide that you can accidentally break the slide with the lens and can damage the scope lens.
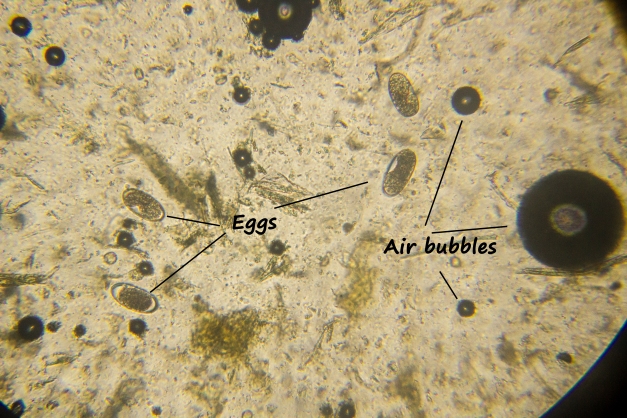
There will no doubt be air bubbles, probably lots of them and at first you may mistake these for eggs. Air bubbles are perfectly round and have very thick, dark edges and clear, often bright centres. Once you realize what they look like, you won’t mistake the bubbles for eggs again, you’ll see that they are very different.
When you are done, check your tally counter or count the total marks you’ve made, this will be the total number of eggs you saw. The results is usually given in Eggs Per Gram (EPG).
Please be aware that this is not an exact science. One person checking a stool sample, using a particular method may come up with a different number of EPG than another person testing the same sample using a slightly different method. Which is why you should use the same tester/method if you want more consistently accurate results. What is also interesting, even if the numbers of adult roundworms present is very high, there may not be all that many roundworm eggs found on the fecal float test. This shows that the number of eggs seen on a fecal float test is not necessarily directly proportionate to the number of adult parasites that are present in the animal being tested. A very small population of adult parasites can sometimes shed a lot of eggs and a very large population of adult parasites can sometimes shed surprisingly few eggs.
For this reason, when checking my own dogs’ stools I don’t do everything particularly accurately. If I were to see just one egg, then they have an infestation that I would need to treat, probably with a natural product such as Diatomaceous Earth and pumpkin seeds. If I were to see many eggs then they have a serious infestation that needs a more radical treatment and I would maybe consider veterinary treatment. As already stated, this is what I would do, I’m not saying this is the correct way but it works for me. I am not a vet and I am not attempting to give veterinary advice.
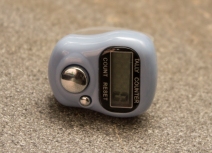 When checking other peoples’ dogs or horses etc., I will be as accurate as possible and do a thorough count using a tally counter strapped to my finger. It is much more important to be accurate, particularly with horses and cattle that live in herds as EPG numbers will determine how, if at all, they are treated (it is normal for some species to have a natural low worm burden).
You may never find any worm eggs in your dogs’ stools, I never have, and when I first learned how to run the test I needed to check many dogs’ stools in order to know that I was doing the process correctly. As a dog walker it was easy for me to have access to lots of stools to practice on, you may need to ask friends and family if you can have samples of their dog’s poo. A little strange asking for random poo samples but you need them to learn.
NOTE: You cannot always see signs of Lungworm in a fecal sample, due to the fact that mature Lungworms reside in the lungs and not the digestive system. You are also unlikely to see Tapeworm eggs in a fecal sample. Tapeworm are a long thin worms that grow in segments which can be found in the feces or clinging to the fur around the anus. Segments will be white, about 1/4 inch long, and may expand and contract. Dry segments resemble cucumber seeds, sesame seeds or rice grains.
More information on worms
http://www.pet-informed-veterinary-advice-online.com/fecal-float.html
http://www.petmd.com/dog/general-health/evr_dg_intestinal_worms_in_dogs
McMaster Slide Test Method
There is also available a very handy tool called a McMaster Slide which provides a chamber in which a precise volume of fecal floatation solution is placed and has a grid to make the counting of eggs a much simpler task.
https://www.youtube.com/watch?v=ZZQymZKe_hs
http://web.uri.edu/sheepngoat/files/McMaster-Test_Final3.pdf
Flotation Solution
We are going to make a saturated solution of Epsom Salt, this means we are going to put as much salt into some water so that the water cannot take up any more. This will cause the water/Epsom Salt solution to become heavier than just regular water, thus, the worm eggs will float to the surface of the solution during your test. You can also use pickling salt or sugar but I prefer to use Epsom Salts. Sugar can get messy and very sticky and harder to work with and to clean up after.
Method
1. Put some of the Epsom Salt in a jar with a tight fitting lid. Fill about 2/3 full with water.
2. Shake the jar well.
3. Add more Epsom Salt.
4. Shake.
5. Over a 24 hour period, keep adding more Epsom Salt and shaking until no more Epson Salt will dissolve in the water you have a permanent residue of Epson Salt on the bottom of the jar. This is now a saturated Epsom Salt flotation solution. Pour off the solution into another jar or bottle, leaving behind the Epsom Salt residue.
As general rule you will need approximately 125g of Epsom Salt per 500 ml of water. Or approximately 180g Sodium chloride (pickling salt) per 500 ml of water.
